Are you looking for a guide on how to start a shopify store in minutes? You're landed on the right page.
Are you struggling to build your brand’s online presence using Shopify and don't know how the process works?
If you don’t already know about Shopify, here is a quick introduction about it, if you already know about it, you can skip this block and continue to the guide.
What is Shopify?
Shopify is a platform that offers you a wholly managed eCommerce facility. You can use this tool to build your online presence in minutes.
It’s not just mere shopping software that you install on your servers like woo-commerce or Magento.
Shopify is different in the sense that it takes away all your burdens and hold it on its own shoulders. The more significant perk is that Shopify operates using cloud hosting.
If you have ever experienced some shared hosting plan or even worked with dedicated servers.
You must have noted that sometimes, the shared hosting runs away from its resources during the peak time of sales, e.g. on black Friday or Cyber Monday or any other events.
The plus point of using a cloud-based hosting is that you never run out of resources; you can easily handle significant brand traffic utilizing the cloud.
Facts about Shopify
There are more than 4M stores powered by Shopify.
So it might not be shocking that:
Not understanding the things in above box? Not a problem!
Because when you use Shopify, you don’t need to learn all these technical things, keep in mind that Shopify hosts your website according to the best available practices.
With Shopify, you don’t have to struggle with the domain, hosting, payment gateways, inventory management, or creating the detailed reports of your customers, leads, prospects, and visitors.
Shopify performs all these tasks for you.
You can either use it to build your online store (which we’re going to discuss in this tutorial about Shopify store creation), or you can use it offline as POS.
Read more about Shopify POS here.
Thus, with more than a million active stores and supporting thousands of eCommerce business ideas, Shopify is your best tool for selling online.
Without wasting a further minute, let’s now talk about our guide.
This Shopify tutorial is not only for the beginners but also for those who have already established their online presence using some other services and are now struggling to start a store using Shopify.
How To Start A Shopify Store in few Minutes
1. Getting Started:
| Plan | Monthly Price (Billed Monthly) | Annual Price (Effective Monthly) |
| Shopify Starter | $5 / month | $5 / month |
| Basic Shopify | $39 / month | $29 / month |
| Shopify (Grow) | $105 / month | $79 / month |
| Advanced Shopify | $399 / month | $299 / month |
| Shopify Plus | Starts at $2,300 / month* | Starts at $2,300 / month* |
Shopify offers different monthly subscription plans to its users depending upon the size of their business or the requirements.
You can, however, start with a for $1/3month to get familiar with how Shopify works and to see all the customization options available.
Let’s discuss a little about these plans and Shopify Pricing before we jump ahead into creating an online store.
Trial:
Nothing is free in this world and neither Shopify.
In these 14 days of the free trial, you can use almost all of the dashboard options except the one, i.e., to remove the password-protected page from your Shopify store’s home page.
Yes! When a visitor enters your store during the trial period, either he has to provide the password to view the page, or the page will remain hidden to him/her.
The good thing (may be bad thing) is that no one is going to start selling in these 14 days because it’s too little time to build your brand. Isn’t it?
So, if you want to get familiar with Shopify before starting a monthly subscription, I’ll definitely recommend you going for a free trial.
Please note that you don’t need to provide them with credit card details to start your free trial.
All you need to provide is a valid email address (btw telling you a secret, invalid email can work too, but be honest if your plans are bigger)
")
Click The Image to Bring your ideas to life for $1/month
Basic Plan:
The Basic Shopify plan costs you $29 per month with the support of unlimited products and two staff accounts.
It also provides you with secure payment gateways and Shopify shipping with many other great features.
If you want to take advantage of these tools, you’re good to go.
Shipping discounts in this plan are up to 64%.
However, Shopify also gives you an option to use your own shipping and payment gateways, which you can easily integrate using the APIs.
If you’re a beginner or just starting with Shopify, you can use this plan after the expiry of your trial version.
Related : How To Start A Successful Blog
Shopify Plan:
Don’t get confused, here “Shopify” is the name of their plan.
This plan costs $79 per month and is suitable for growing businesses.
This plan offers all the advantages of the basic plan with some extra cherries on the top like up to 72% shipping discount and reduced credit card processing fees.
This subscription offers you up to 5 staff accounts.
Advanced Shopify (for scaling your business )
The Advanced Shopify plan offers all the perks available in previously discussed plans with some extra advantages and more discounts on using Shopify shipping and payment processing.
You can opt for this plan if you want to scale up your already established business with Shopify.
This plan offers up to 15 staff accounts.
If you want to compare all the advantages and limitations of these plans, please visit this link
Note:
In addition to these plans, there are two other plans that are offered by Shopify.
Lite Plan: To integrate Shopify payments in your Facebook shop or on your self-hosted website. This subscription costs $9/month.
Shopify Plus: Businesses that are well established and process a considerable amount of orders every day.
This plan will help with that. The pricing depends upon the size of the business. You can ask Shopify for a quote.
If you’re just starting, all you need is a trial to get familiar with Shopify, and then the basic plan will serve the rest of the needs.
2. Creating Your Store:
But before you set up your shop and get into the milk – there are some essential actions you’ll need to take.No design skills needed.
To create a store, you need to go to the Shopify website and avail your free trial or a plan, whatever you prefer.
In this pictorial tutorial of Shopify, we are going to avail the free trial. Here are the steps.

To do so, go to shopify.com, In the email box, enter your email address and click on start free trial. Please register using a valid email address that you check often.
After clicking on this button, you will be redirected to a different page where you need to put in your password and store name.
You should choose a store name according to your brand, Shopify will now look for the uniqueness of your chosen name.
If someone has already created a Shopify store using the same name, you can register it by adding some prefix or suffix.
Tip:
Don’t worry about this store name, after connecting your store with your purchased domain, you’ll not need this name.
Also, this free name comes with a parent domain. E.g. If I am going to register the store name “example,” it’ll become “example.myshopify.com.”
So, to make a reputable brand, we highly recommend you using a TLD (Top Level Domain) name for your site.
Top-level domain names are the names that contain extensions like “.com” “.net” “.co.uk” and so on.
We’ll discuss adding a TLD name in the last section of this tutorial.
Related Topic : Amazing Facebook Ads Spy Tools For Higher Sales
After you have filled these three fields, you have to enter your business details, i.e. Shopify will like to know if you already sell on some platform and what is your current revenue.
This will help them in building the platform better. You can skip this step if you want.

Under this section, you will see another checkbox asking “are you setting up a store for a client.”
If you’re not a professional developer and are not doing it for some client. You can leave this box unchecked.
In the next screen, you need to put in your address details, use your correct business address in this section.
At this point, you need to understand that this business address will be visible to your customers too.
So, make sure to use your proper business’s operation location.
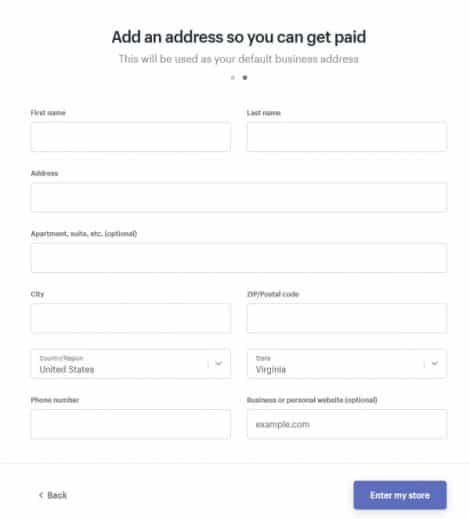
When Shopify creates automated templates for your legal pages, they use this address to save your time. (Although you can change the templates before making the pages public)
Cool! As you’ve entered all these details, it’s time to move to the next step, i.e. to understand your dashboard.
Yes! You’ve done it!
3. Understanding The Dashboard:
Before continuing to create your e-commerce site, we will review the different sections of your admin.
The Shopify’s dashboard is super clean and easy to understand.
There are tons of options available that we’re going to discuss now.
In this section, we’ll discuss each and every option available and what is the purpose of that.

Home:
This section is your home page, where you’ll see concise daily reports of certain parameters in your Shopify store.
As in the case of this example, it’s a new store, so you’re only able to see certain features to get started with Shopify, like adding your custom domain name, product, or customizing the theme.
Orders:
When you will receive your order, they will be available for review and processing in this area of your Shopify store’s admin panel.
You can do a lot of stuff with your orders in this section.
You can process them, cancel them or change the details (if the customer requested via support)
You can also create custom orders for your customers in this section,
e.g. if some customer orders via email or some other personal way, you can create an order for them to invoice them and get paid via Shopify.

“Abandoned checkouts” is the tab under the “orders” section where you can see those checkouts which did not proceed to payment,
i.e. when some customer adds a particular product in their cart, move the cart to check out but didn't continue to payout.
You can retarget those customers via email marketing to generate more sales because those people are already interested in your products but were not able to fulfill the check out for some reason.
Products:
The Products section includes all the products that you’re going to sell on Shopify.
This can consist of both physical products or digital ones, and even if you sell services to your clients, they will be considered as your products too.
You have many options to play in this section as well:
You can upload new products, edit or delete them. The products section also keeps track of your transfers, inventory, collections, and gift cards.

Transfer: For keeping track of incoming inventory.
Inventory: To keep the record of the availability of products, i.e., how many products are available to sell.
Collections: These are your Shopify categories.
Gift Cards: If a customer is interested in buying a gift for his/her loved ones but can’t decide what they will like, these customers, then, prefer buying a gift card from the store so their loved ones can shop as per their choice.
So, in the section of gift cards, you can manage your gift cards.
Customers:
This section is the list of your customers.
You can play with the settings to manage a lot of options available as per your choice.
At a quick glance, this section contains all the facilities to import, export, add, and manage your customers and the settings for new customers.

Analytics:
The analytics section in your Shopify admin dashboard shows not only the conversion and traffic reports but also the live statistics.
The page shows you:
The statistics of orders, conversions, marketing results, working landing pages, converting referrals, average revenue, devices, locations and the sources that help in generating more earnings.

From the “reports” section, You can also create a custom report for your ease.
Marketing:
It’s said that a brand is nothing without proper brand awareness, that’s where marketing plays its role.
You can automate your digital marketing campaigns in this section of your dashboard.
To do so, all you need is to connect your Facebook ads or Google merchant center account with your Shopify and manage the campaigns from inside the panel.
Awesome! Isn’t it?
But that’s not the end! You can use this section to start email marketing automation as well which will help you in converting leads to prospects and customers.

If I start telling all things digital marketing automation includes, we can’t continue with the guide because that will go far away from the scope of this guide.
So to stay focused, let us move towards the next part.
Try Shopify free for 1 Dollar
no credit card required
Discounts:
Who doesn’t need a discount? Well! Your Shopify store helps you in creating discount coupons as well.
You can give these discount coupons to your customers to make them happy and in return to generate more sales.
According to research, most people surely shop when they find a great discount coupon.
You can create coupons based on percentage discount, free shipping, Buy X get Y free, or a fixed amount off from the order.
Apps:
The apps section is built primarily to integrate extra functionality in your Shopify store.
There are hundreds of apps available in the Shopify app store that can help you in adding more value to both front-end or back-end/ admin panel.

Sales Channel:
How can we leave front-end or customization when dealing with an online store?
Worry not! Our next section is based upon this.

Theme:
This section will decide the layout for your Shopify store.
There are hundreds of Shopify themes available in the market. You can use them to make your store according to your will.
Some themes are free and some are paid. It’s up to you whichever you like.
After setting up a theme you need to customize it according to your choice.
We’ll discuss the customization in another section of this tutorial as this is a basic go through section, so let’s move to the next functionality.

Blog Posts:
You can use this area either to create posts about brand awareness or to include some informative content to get traffic via SEO.
This feature can also help in publishing your brand stories.
Keep your blog updated to get new readers and to keep an attachment with your customers.
The blog section is also a great way to start your email marketing campaigns because most people hate when we only send them the products to buy.
Sending them some informational content can build brand authority and trust.
Related : How To Start A Successful Blog in 4 steps.
Pages:
Pages are used to display content on the site that you don’t change often, e.g., the contact page, about us page or legal pages such as terms of service, Disclaimers, shipping policy, or privacy policy.
Pages are static in Shopify by default and help in displaying the content that customers can refer to.
If you want to update your stories or informational material on a regular basis, it’s better to use the blog section.
Navigation:
This is your site’s menu.
All can edit the menu and set it as per your requirements.
It’s super easy to create, edit or remove it. Most people, however, keep it to list their product categories in their store’s header.
Domain:
By default, your Shopify store comes with a subdomain, e.g., example.myshopify.com, "Example" is your brand name, and myshopyfy.com is the actual domain.
If you want to use your own TLD with Shopify, you can do so by either buying a domain from Shopify or by registering it from some third party ( like namecheap).
Preferences:
In this section, you can use your metadata, i.e. meta description and title.
These are the things that Search engines will crawl to rank your site.
Make sure to avail the opportunity to write the best Search engine optimized copy for this section.
You can also put your google analytics or Facebook pixels tracking codes in the respective boxes available in this section to check your conversion and traffic details via these powerful platforms.
All this data will help you with better marketing.
Recap
Home: This is not the homepage of your dashboard (at the admin panel). This is where you will find a summary of the data of your e-commerce site.
Orders: you will find in this section all the baskets created (not finalized or abandoned) and orders placed.
Products: here, you can create product sheets, create collections, manage your stock and even create gift cards.
Customers: you will find a set of data on your customers as well as the details of their orders. You can even link this data to other tools such as MailChimp.
Analytics: In this section you will access statistics of your e-commerce site.
Discounts: allows you to create promotional codes.
Apps: this is where you can add functionality to your Shopify store by downloading apps.
Sales Channels: here you can manage many aspects of your online store (add pages, manage preferences, choose the theme ...) and add other points of sale (Facebook, Amazon ...).
Settings: this is where you can manage the administrative side of your site and configure payment methods for example.
Related : 15+ Best Hosting For WordPress
4. Adding The Products:
Till now we have taken a concept of all the available tools in the admin panel of the Shopify store.
Real work is starting from this step. We’ll now go through the process of adding the products to the Shopify store.
First of all click on “all products” and go to “add product.”
This will open the product uploading screen as shown in the below image.
I have marked each one with a different number so we can have a straightforward idea of what we are going to do and what is the step we are discussing.

Note: You don’t need to fill in all the boxes to publish your products, you can skip some if they are of no use for you.
Enter the title for the product or its name. Try to add your focus keywords in the title. For example, “Relaxing pillow.”
Enter the description of the product. Please take care to add as much relevant concise, and understandable description as you can.
There are a lot of text editing options available for description like your MS word. You can also use images and videos to add more details.
Add the product images; you can either add a single image or multiple images either by directly uploading or importing from URL.
Make sure to use high-quality photos and videos. I use depositphotos to get quality photos.
Collections are the product categories, to create a collection, click on the collections tab in your products section and add as many categories/collections as you want.
After adding them you can post each product in their respective category.
Tags work like extra keywords that a user might be searching in addition to what you provided in your title. You can add other keywords as your tags.
To organize the products better, you can add vendor details or product types too.
The idea here is you can manipulate the products on a later stage based on all the values you have put in.
The first portion of the product section is now completed, let us move to the next.
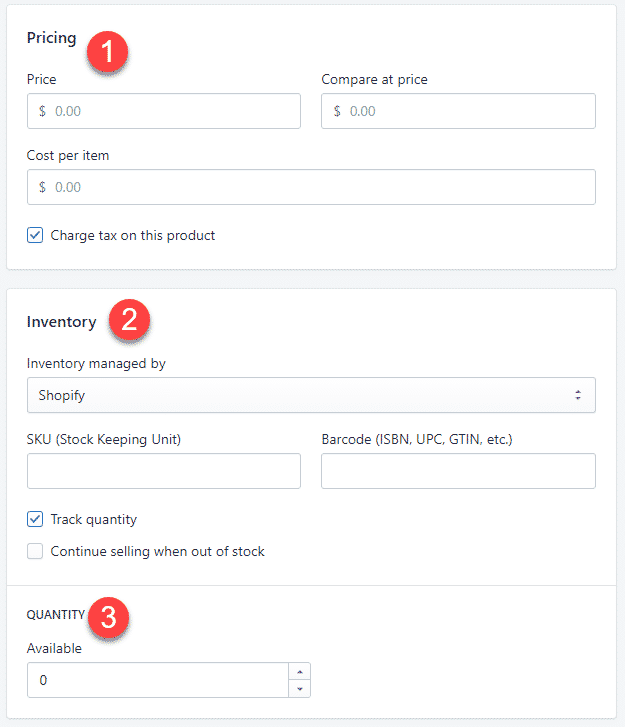
In the pricing section, you will see three boxes each for a different option.
The box labeled as "Price" is the price you want to get from your customers during the checkout page.
The “compare at price” is the price if your products are at sale. E.g. if you sell your product of price $120 for to $80.
You will write $80 in price and $120 in compare at price. Cost per item is the actual cost of the product that you’re going to bear.
The Inventory option is to keep your store updated with the stock keeping unit and barcodes.
You can have your custom stock keeping units to track the sales. The barcode number is usually available at the products.
The Quantity option is to keep track of your available stock.
You can put the number of items available at your warehouse.
(Note: if you want to continue receiving orders even when out of stock, you need to check the option “continue selling when out of stock”)

The next thing is shipping. If your product is digital product or service, you can leave this checkbox unchecked.
Most shipping companies charge according to the weight of the product, so it’s better to mention the weight of the product, so Shopify can automatically calculate the shipping price for the customer.
If you’re giving free shipping, still it’s a good practice to mention the weight at the store.
Let’s move to the last step in adding the product, i.e. to add variants and do some search engine optimization.

Variants are the different forms of the same product.
E.g., if you are selling a shirt that comes in seven different colors, you can use the variants section to add the details of each color and their sizes to make your selling process smooth.
If you click on Edit website SEO, you’ll see two boxes, each for a meta title and meta description of your products.
You must enter some catchy and keywords rick metadata to help search engines rank your site higher.
Also, make sure to write a proper copy in this section because it is how your product will appear on the search engines result page.
So, these two lines can decide if the user is going to click and visit your store or not.
With this process, you can upload all of your products and arrange them into proper categories/collections.
Bonus Tip: If you are planning to resell Aliexpress products via Shopify, you don’t need to do all this hard work of adding products manually to your store.
All you need is to install an app called “Oberlo” officially developed by Shopify.
With this application, you can automatically import hundreds of products from Aliexpress, directly into your Shopify store.
This application can help in making your dropshipping process automated, smooth and effortless.
People who sell on Shopify via Aliexpress have always appreciated this application.
5. Choose and install a theme on Shopify
We will start to configure our e-commerce site by choosing a theme in order to personalize the appearance of our shop.
Go to Sales Channels then click on "Themes".
Shopify offers many themes, some free, others paid.
Paid themes will offer more advanced features and will be more easily customizable, but free themes are a good compromise to get your hands on Shopify.

To choose a Shopify theme, here is what you need to consider:
1. The type of product you sell,
2. The number of products you want to sell,
3. The images you will use
To install a theme, you can click directly on "Explore Free Themes" to have access to a dozen of free Shopify themes.
You just have to click on a theme to discover the functionalities and then click on "Add" when a theme suits you.

You can also click on "Visit Theme Store" to access the shopify themes shop. You will then find paid themes, but also free themes.
Click on a theme for more details and view the demo.
When your choice is made, click on "Buy theme" if it is a paid theme, or on "Add theme" if it is a free theme.

Your Shopify theme is now installed. You can customize it by clicking on "Customize".

Some of the best Shopify Theme:
6. Adding Essential Pages:
With Shopify, you will be able to create different pages for your e-commerce site: "Who are we?", "Contact", "F.A.Q", "Legal notices" and more.
To build the authority and validity of your store, you need to add essential pages to the website.
These pages are the legal pages, about us page and the contact page.
Let’s learn how to create them. You can see in the below screenshot that I have created all these pages to build brand trust and be transparent to my clients.
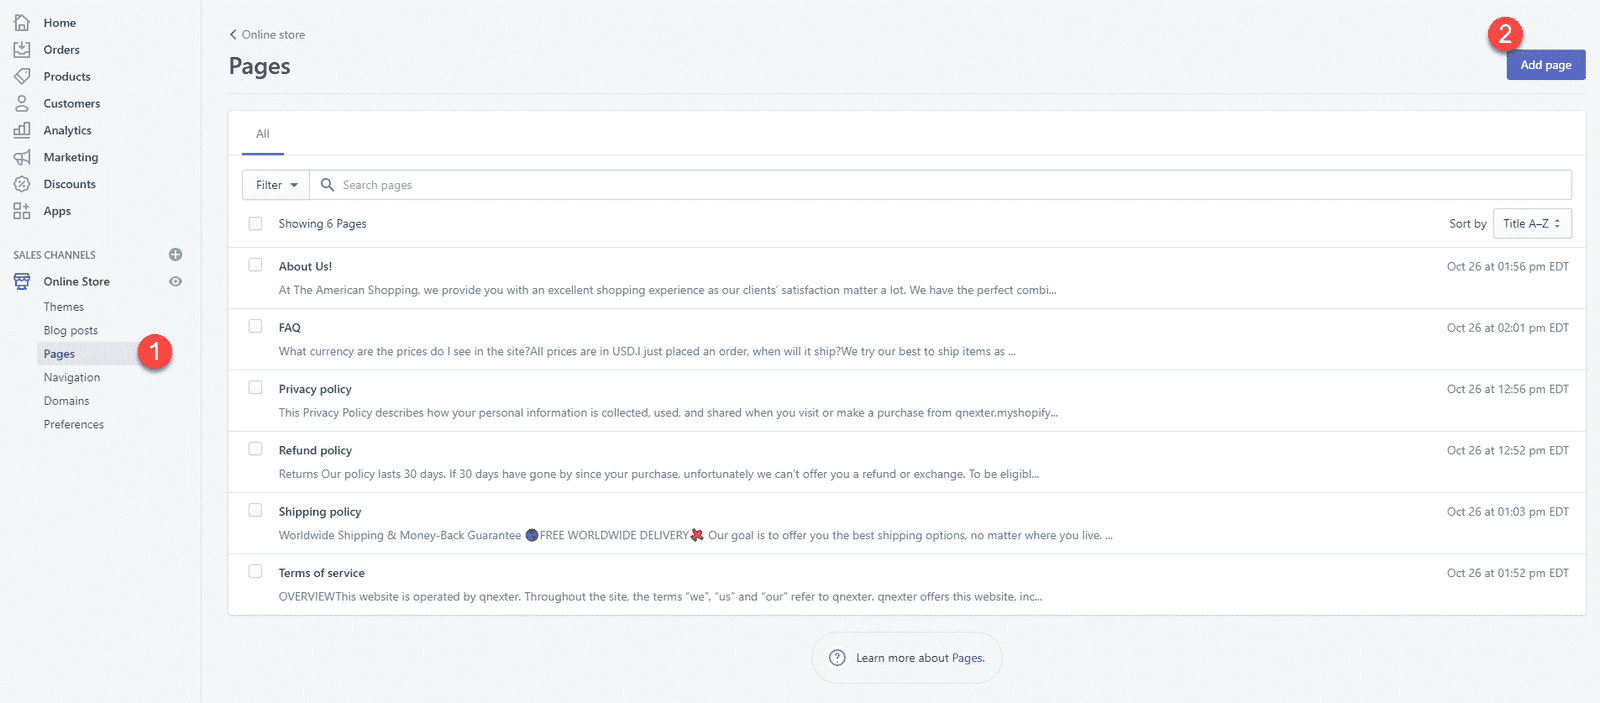
- 1To create a page, click on “Pages” from your Shopify admin dashboard, it’ll show you all the active pages in your Shopify store. If your store is new, you will not be able to see any pages. Don’t worry; we’ll learn how to create them easily.
- 2Click on “Add Page”
After this, you will see the option for adding page content, fill in the details of your title and content and save them.
Related: Things to consider before starting E-Commerce Business
Bonus Tips: If you don’t know what to write in legal pages, you can easily create the pages using your Shopify page creation tool. Here is the quick tutorial for that.
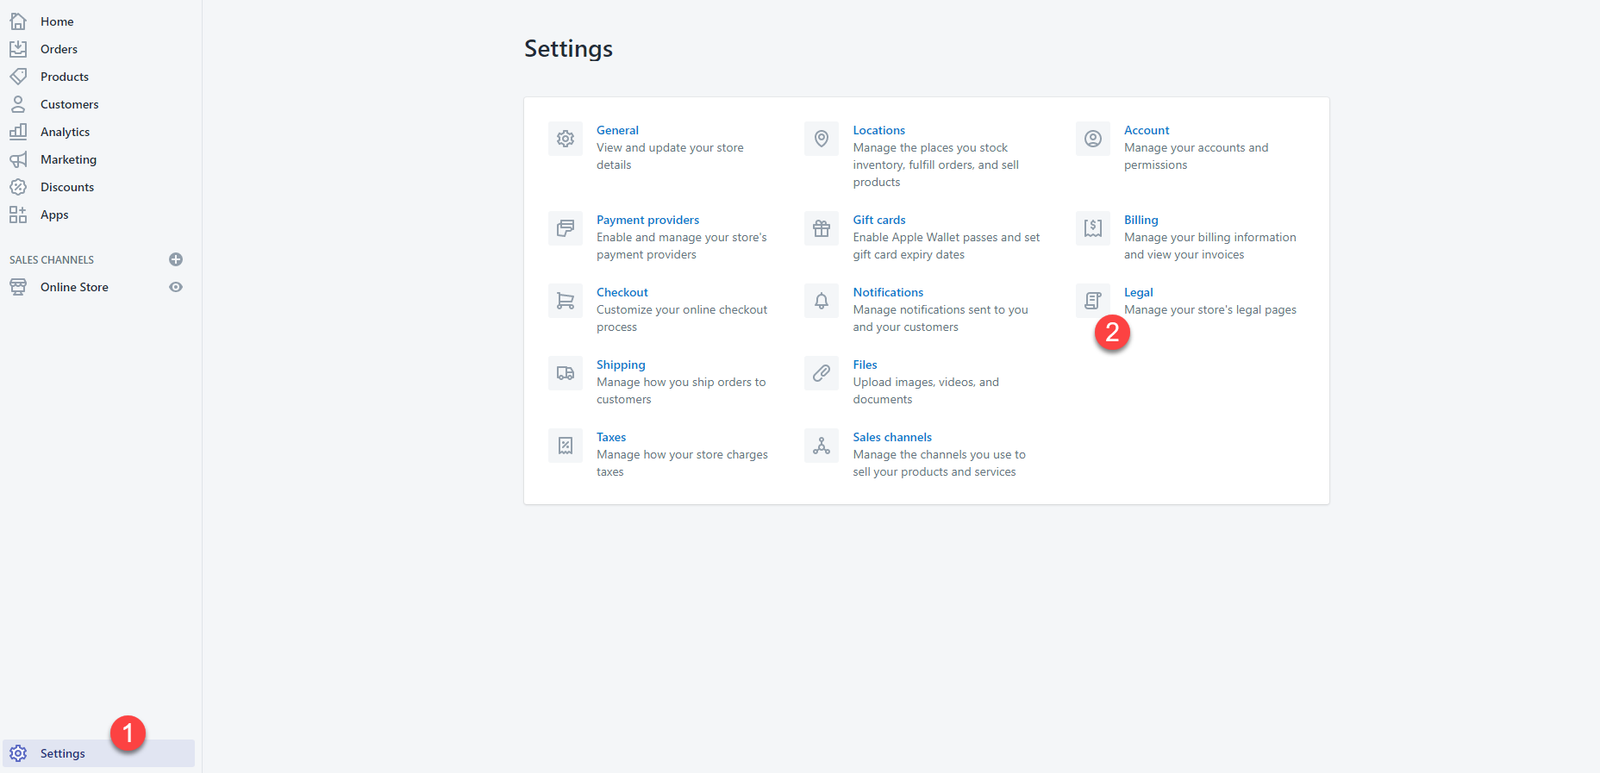
Click on settings and select legal. It’ll open the page template generation tool.
Click on generate and copy the generated content, paste it into your Shopify pages (you can make necessary edits if you want).
After adding these pages, you can create a custom menu in your Shopify dashboard via the navigation option and add these pages to either some other location or your footer.
Footer is mostly used for this.
7. Customizing The Store:
The customization process involves all the steps that are required to design the layout and look of your store.
To get started with customization let’s follow these below images.
Click on the “Themes” section and select your desired theme.
There are hundreds of Shopify website templates available on the web, if you don't like a free template you can buy a premium one.
After selecting your theme click on customize to make changes according to your choice.

You can change colors, font families, images, buttons, show/hide sections and much more.
You can customize each and every thing through this super easy process.
Tip
To track your online store’s traffic and conversions via google, you need to signup for google analytics. After creating your account. You will be given a tracking code. Go to your Shopify store’s dashboard, click on the preferences tab and paste that tracking code here. Congratulations! You have set up google analytics tracking.
8. Configure payment methods
To configure the payment methods for the products of your e-commerce site, return to "Settings" then click on "Payment providers".

We advise you to install PayPal because this method of payment is appreciated by many customers.
The PayPal Express Checkout version is more than sufficient since it will allow your customers to pay by credit card via PayPal or directly from their PayPal account.

In "Accept Credit Card" you have access to the different payment partners of Shopify.
We advise you to select "Stripe" which is one of the best online payment solutions and one of the simplest.

By clicking on "Activate", you will be required to enter information in order to activate your Stripe account. Click on "Authorize access to this account" to validate.

You can also add alternative payment solutions from "Alternative Payments" and even activate Amazon Pay.
"Manual payments" can be useful when some of your customers cannot (or do not want) to use their bank card for example.
When your customer uses manual payment, he/she sends you the money outside your e-commerce site: it can be in cash or another bank account for instance.
When you get this payment, you can manually approve the sale.
Finally, in "Payment authorization" you can decide to receive payments automatically at the time of the sale, or validate them manually.
When a customer makes a payment using a credit card, the payment information must be entered and sent to their bank for processing.
Automatically: you can automatically charge customers' cards before the end of the authorization period, which saves time when processing orders.
Manually: you will need to make payments from your administrator's Orders page.

Quick Tip:
To help you set up your means of payment, you can call a Shopify expert
9. product Shipping Configuration
Go back to "Settings" then click on "Shipping".
In "Shipping rates at checkout" you will be able to define delivery zones by clicking on "Add shipping zone". You will be able to select the countries concerned by the defined area.
You can also set taxes based on the price of the order or its weight.
In the "Packages" section, you will be able to define the dimensions of the packaging necessary for the shipment of your products.
These dimensions can be used to calculate costs on the delivery of your product.
Tip: most carriers charge according to the size and weight of the package. So be sure to use the smallest packaging possible.
10. Add discounts to your products
With an e-commerce site, you will certainly have to offer discounts to your customers. Shopify allows you to configure discounts very simply, let's see how.
Start by going to "Discounts" in your left menu and then click on the "Create discount" button.

Enter a name for your promotion code or click on "Generate code" to have Shopify generate a random promotion code like "EMARKETINGDS16X" for you.
Then select the type of promotion you want to implement.

You can also set metrics (like $10 off, 15% off, only on orders over $150, etc.).
Percentage: enter the percentage of your reduction in "Discount value"
Fixed amount: enter the fixed amount of your promotion in "Discount value"
Free shipping: select the countries in which you wish to offer the delivery and / or enter the amount from which the delivery is offered in "shipping rates"
Buy A get B: fill in the quantity purchased in "Customer buy" then enter the quantity offered in "Customer get".
Then choose if this promotion is in percentage (for example "-30% on the second product purchased") or in unit (for example "3 products purchased, the 3rd offered")
In "Applies to", select on which elements you want to set up your promotion: all your products, some collections or some products.
Note: this part is not available if you choose "Free shipping" and "Buy X get Y" as the type of promotion.

In the "Minimum Requirement" section you can select from when your promotion takes place: from a certain purchase amount or a certain quantity purchased, for instance.
Note: this part is not available if you choose "Buy A get B" as the promotion type.

In "Customer eligibility" you can choose to apply your promotion to all customers or only to particular customers.

You can also limit the use of your promotion code in "Usage limits".

The last element to configure for your promotion will be the date in "Active dates". You can precisely select the start date and the end date of your promotion.

After all these configurations, don't forget to click on "Save discount'' :).
Tip.
With Shopify it is possible to set up a deeper reduction system by creating a loyalty program. you can use apps like smile
The Complete Shopify Aliexpress Dropship
course
11. Choose a new points of sale
By default, your products are only sold in your online store. In your "Sales Channels" menu you therefore only see "Online Store".
If you want to sell your products on other platforms, go to "Settings" and click on "Sales channels".

You just have to click on "Add sales channel" and then choose a new point of sale such as Facebook, Instagram or Amazon.

These points of sale will then be added to your left menu and it will then be necessary to configure them correctly.
12. Place a test order
After all these configurations that you had, it is important to verify that everything works fine.
It should not be that the first purchases on your online store go wrong, in which case you may run away from your first customers.
Go back to "Settings" and then to "Payment providers".

If you had configured a payment method such as "Stripe", click on "Desactivate". In this way, you should again have the "Accept credit cards" section.
In the drop-down menu, select "(for testing) Bogus Gateway" then click on "Activate".

Go to your online store and place an order as if you were a customer.
When confirming your order, enter one of the following digits instead of the credit card number, depending on what you want to simulate:
1: you will simulate a successful transaction
2: you will simulate a failed transaction
3: you will simulate an error on your site during the payment
For the CVV you can simply enter a 3-digit code and for the expiration date be sure to enter a date in the future.
When you have paid, you can return to your administrator and see what is happening in "Orders" for example.
At the end of your test, do not forget to cancel the order so that your stock is not distorted.
13. Going Live
Hurrah! It’s time to go live but after doing these little steps.
Before going live on Shopify, and jut to recap :
Make sure you have set your payment gateways, for this purpose go to settings, click on payment providers, activate your Shopify payments, attach your PayPal, Stripe or any other payment gateway in which you want to receive your money.
Lastly, to add a custom domain name to your Shopify store. Go to Domains section, click on the buy new domain and register a new domain for your business.
Note: If you have already registered domain name and want to connect it with your Shopify store, click on “connect existing domain” or select “transfer domain” if you're going to manage the domain’s billing via Shopify.
After you have connected your domain name, it’s time to make your apparent public. Share your new store with the world! Keep rocking.
This was all about starting a Shopify store within minutes. If you have any more queries, please feel free to ask in the comments section.
Frequently Asked Questions
How much does it cost to start a Shopify store?
Do you need business license for Shopify?
Can you make money from Shopify?
Does Shopify provide products to sell?
Can I use Shopify with my own website?
How do I promote my Shopify store?
Bring your ideas to life for
$1/month
One platform with all the eCommerce and point of sale features you require to begin, run, and build/grow your business.
Affiliate Disclosure
This article may contain affiliate links: means , if you click on one of these links and make a purchase ( which we appreciated ), then I'll receive a small commission without affecting the original price ( without costing you anything extra ).